How to Break the 3-Minute Breath-Hold Barrier in Freediving?
TECHNIQUES & PREPARATION


Breaking the three-minute breath-hold barrier is a significant milestone for many freedivers, often marking a turning point in their practice. For some, this goal may seem a little intimidating, but with the right techniques and gradual training, it becomes completely achievable. This article will guide you step-by-step to overcome this threshold, explaining practical exercises, tips for better understanding and mastering your body, and proven techniques. So, are you ready to push your limits and dive deeper with confidence?
1. Understanding the Physiological Basics
To improve your performance, it is essential to understand what happens in your body when you hold your breath. You’ll see, it’s fascinating!
The Dive Reflex: Your Natural Ally
When you dive into cold water, your body activates an incredible mechanism: the dive reflex. This phenomenon, a real advantage for freediving, triggers several reactions, such as slowing your heart rate (bradycardia) and reducing blood circulation to the limbs so that your vital organs receive more oxygen. In short, your body automatically switches to "energy-saving mode" to allow you to hold your breath longer. Convenient, right?
The Role of Carbon Dioxide (CO₂)
You may already know this, but it’s not the drop in oxygen that makes you want to breathe. It is actually the accumulation of CO₂ in your body that sends this signal. The more your body produces CO₂, the stronger the urge to breathe becomes. By learning to better tolerate these high levels of CO₂, you can extend your breath-hold time. We’ll see how in the exercises below.
Oxygen Saturation (O₂)
Oxygen is what fuels your cells. During a breath-hold, your blood oxygen level slowly decreases. When this level becomes too low, you risk hypoxia, a condition where the body lacks oxygen, which can cause fainting or even blackouts. Don’t panic! The goal is to find the right balance: tolerate CO₂ while managing the drop in oxygen.
Nothing beats a clear diagram to understand these physiological mechanisms.
2. Breathing Before the Dive: Optimizing the Preparation
The key to a successful breath-hold is preparation. Controlled breathing and relaxation are essential for this.
What Is Controlled Breathing?
Controlled breathing simply involves breathing calmly and steadily to optimize your oxygenation. Before diving, you must lower your heart rate and relax to avoid consuming unnecessary oxygen. Here are a few tips:
- Breathe slowly and deeply.- Relax all your muscles to avoid spending energy.
- Make slow movements to conserve oxygen.These small habits, when combined, will make a significant difference in your breath-hold duration.
Diaphragmatic Breathing: Your New Best Friend
Diaphragmatic breathing is one of the most effective ways to fill your lungs to full capacity. Not only does it allow better oxygenation, but it also calms your heart rate. Want to try?
Here’s a simple exercise:1. Lie down or sit comfortably.
2. Inhale deeply through your nose, expanding your belly like a balloon.
3. Continue filling your lungs all the way to the top, slightly raising your shoulders.
4. Exhale slowly through your mouth, deflating your belly.Repeat this exercise regularly, and you will quickly notice an improvement in your breath-hold capacity.
It’s a real game-changer!CO₂ and O₂ Tables: The Secret to Pushing Your Limits
To improve your breath-hold tolerance, there are two very effective types of breathing exercises: the CO₂ tables and O₂ tables.
- CO₂ Tables: These involve shortening the recovery time between breath-holds while keeping the breath-hold duration constant. This helps your body adapt to high CO₂ levels. For example, start with 1-minute breath-holds and 2 minutes of rest, then gradually reduce rest to 1 minute, 45 seconds, and so on.
- O₂ Tables: These work in reverse. Recovery time remains constant, but the breath-hold duration increases gradually. This trains your body to use available oxygen more efficiently. For example, start with a 1-minute breath-hold, then increase by 15 seconds for each round while maintaining 2 minutes of rest.
These exercises are powerful tools for overcoming the urge to breathe caused by CO₂.
Relaxation: The Secret Weapon of Freedivers
Stress and anxiety accelerate your oxygen consumption. That’s why relaxation before and during the breath-hold is critical. A good relaxation exercise is the body scan. Start by paying attention to your head: Is your jaw relaxed? Are your eyes tight? Then, move through each part of your body to release tension. Once fully relaxed, visualize a calming environment, such as a familiar landscape or a pleasant memory. This helps distract you from the passing time and keeps you serene.
Photo by : Timo Wagner
3. Physical Training: Boosting Your Freediving Endurance
In addition to breathing and relaxation, physical training plays an essential role in freediving.
Strengthening Respiratory Muscles
Respiratory muscles, such as the diaphragm, must be strengthened to better manage breath-holds. For example, the stomach vacuum (or abdominal suction) is an excellent exercise for this:
1. Stand upright, exhale all the air from your lungs, then draw your belly toward your spine.
2. Hold for a few seconds.You can also use respiratory resistance devices to make inhalation and exhalation more challenging, further strengthening these muscles.
Cardio and Strength Training: A Winning Duo
For freediving, a good balance between cardio and strength training is essential. Cardio, such as running or cycling, improves your ability to use oxygen efficiently. Strength training, on the other hand, strengthens your muscles without significantly increasing oxygen consumption. Interval training sessions are particularly recommended to condition your body to function under low-oxygen conditions.
4. Developing Psychological Tolerance to the Urge to Breathe
Freediving is also a mental game! Often, it’s our brain that pushes us to breathe well before it’s truly necessary. This sensation, caused by CO₂ buildup, is a survival reflex—but the good news is that you can train yourself to tolerate it.
Take it in progressive steps
The best approach is to gradually resist the urge to breathe.
For example, when you feel the urge to breathe, hold for another 10 seconds, then rest.The next time you try, hold for 20 seconds, then 30. It's not about forcing yourself, but about gradually getting your body used to tolerating this sensation.
Your body adapts, and you learn to manage this sensation without panicking.
Mental techniques
Here are some techniques to help you overcome the psychological obstacle:
- Positive visualization: Imagine yourself successfully holding a long breath.It's proven that visualization builds confidence and reduces stress.
- Mental counting: Counting in your head helps distract you from the urge to breathe.
- Mindfulness: Stay focused on your bodily sensations, without judgment.
This mindfulness technique is excellent for learning to accept and tolerate the sensations of lack of air without giving in to panic.
My personal experience: I try to describe a room in my childhood home with as much detail as possible so as not to think about the time passing.
5. The Importance of Safety in Freediving
Breaking the three-minute barrier is a great milestone, but always prioritize safety. Some basic rules to never forget:
Never Alone:
This is the golden rule of freediving. Always have a buddy or observer to ensure safety.
Not alone in a swimming pool or in the bathtub either.
"This is what happened to the Belgian freediver Patrick Musimu who drowned during training in his swimming pool. Despite the fact that he was an experienced and qualified freediver. This did not prevent the accident from being fatal."Know Your Limits:
Listen to your body and progress slowly.
Slow Progressing in a slow and controlled manner is the key to avoiding accidents and calmly improving your abilities.Warm-Up and Recovery:
Proper warm-up prevents cramps, and recovery helps avoid fatigue-related risks.
In Summary:
Breaking the three-minute freediving barrier may seem like a challenge, but with the right methods, it is a goal that is easily achievable for many of us. It is not just a question of physical performance, but also of mental and self-management. Patience, discipline, and above all, safety, are key elements to success. So, start incorporating these techniques into your practice, and with a little perseverance, you will be surprised at how far you can push your limits.
Understand the physiological mechanisms of freediving (CO₂, O₂, and the dive reflex).
Practice breathing techniques (diaphragmatic, CO₂, and O₂ tables).
Focus on relaxation before and during breath-holds.
Strengthen your respiratory muscles and physical endurance.
Train to manage the urge to breathe, both physically and mentally.
Always be vigilant about safety.
With perseverance, you’ll find that the three-minute mark will soon be behind you, and you’ll continue progressing in this fascinating discipline of freediving.
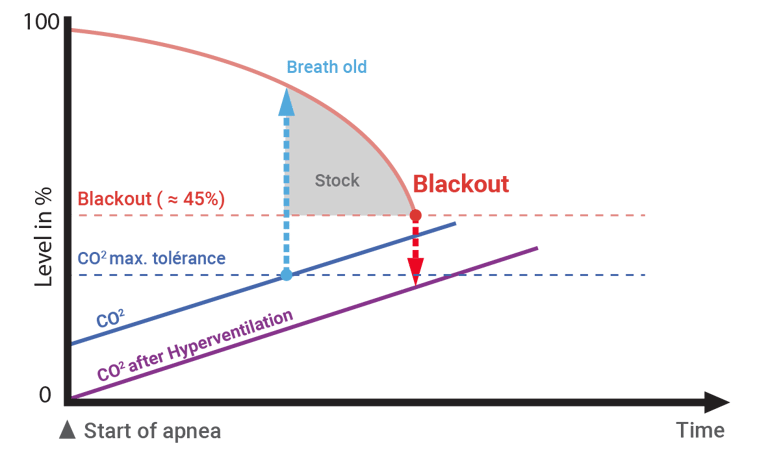
We can see that at the beginning of a breath-hold, the oxygen curve is very high, with O₂ saturation around 96-98%, corresponding to your initial inhale. In contrast, the CO₂ curve is very low. The longer you hold your breath, the more the oxygen curve drops, as O₂ is consumed by the muscles and organs, which in turn produce CO₂ that accumulates in the body.
This highlights an important principle in freediving: the fewer movements and efforts you make, the more oxygen you conserve—and therefore, the longer you can last.
When the CO₂ level crosses the maximum tolerance threshold (blue point), it will trigger your urge to breathe—not the lack of oxygen, as there is still a substantial reserve.
However, be careful not to push yourself too far, as this could lead to a blackout, with the limit generally around 45%. Remember, these indicators are averages; each individual has their own characteristics that evolve depending on practice, abilities, and physical condition.
Hyperventilation (purple curve)
Hyperventilation occurs when you increase your breathing rate along with accentuated inhalation. This leads to an increase in oxygenation and a decrease in carbon dioxide. However, it’s important to note that hyperventilation does not increase oxygen saturation in your blood—it only lowers CO₂ levels. Since it’s the accumulation of CO₂ that signals the need to breathe, low CO₂ levels delay this warning, which can result in a blackout, as shown in the purple curve.
This is why hyperventilation should not be practiced.Blackout (red point)
A blackout is a reflex mechanism you don’t feel coming and causes you to lose consciousness. It’s as though the brain “reboots” the system to regain control. On land, this isn’t a big problem because the breathing reflex kicks in, and you resume breathing after a moment of grogginess. However, underwater, this reflex can be fatal because during instinctive breathing, you risk inhaling water, leading to drowning.
This is why having a safety buddy is crucial; they can intervene quickly to get you to safety.
Remember, this is the ultimate limit that must never be crossed.
Note : This is such a broad topic that we won’t go into further detail here—it will be the subject of a future article.Marge de progrès (grey reserve)
As mentioned earlier, it is the excess of carbon dioxide in the body that triggers the sensation of air hunger, not the lack of oxygen. This is represented as the gray zone on the graph, which lies between the breathing alert and the red blackout point.
This is the time window where we aim to push our limits slightly, gradually increasing our breath-hold time and getting used to the sensation—without ever going overboard, as this would be counterproductive and dangerous.
How much is this limit? That’s the mystery, as it varies depending on your physical condition, practice level, effort, and prior breath-holds. Therefore, progress gradually with short, limited times, such as 15 seconds on a range of 30 to 45 seconds at first, before slowly building up to 1 minute.Avoid pushing too hard and putting yourself at risk unnecessarily. This type of exercise MUST be supervised with clear guidelines on what you will do.


Photo by Stefano Zocca.
